February 16, 2021
How do I lose weight? This question has been asked by countless patients over the past score plus years I have been in practice. The thought process should be,
“How do I decrease body fat?”
A healthful body composition (percent lean muscle mass to water to body fat) is the goal. Lowering the percentage of body fat will bring your weight into line with your health.
Generally, the adult male should be between 10-15% body fat and the average female should be 5 to 7 percent higher.
A combination of eating several small healthful meals per day and regular exercise are essential to successfully attaining your health goals. The information packed into this section is geared toward building a fat burning machine through exercise. Dietary concerns are touched upon in other sections of this site. Before beginning this or any fitness program get the OK from your health care provider. Please see disclaimer section on this site for more information regarding this issue.
“Winners outrun defeat by not stopping;
Losers give in to defeat by not starting.”
The following guidelines are designed to maximize your investment. When performing exercises in this section, close adherence to these guidelines will maximize your efforts in terms of decreased percentage of body fat, increased strength and endurance as well as enhanced coordination.
GUIDELINES
When performing these exercises:
- Breathe slowly and rhythmically in and out from the mouth during the full movement of every repetition.
- Breathe in as you prepare for movement and out as you move.
- Perform each exercise very slowly. The positive part of each exercise should be performed to a 7 to 10 count (unless otherwise instructed). Counting out Mississippis or using the second hand on a clock are excellent ways to keep on track of your cadence. The negative part of the movement is performed to a five (5) count. The negative part of an exercise is when the muscle is shortening or contracting against resistance. The positive part is when the muscle is lengthening against resistance).
- Perform each movement to failure. The goal is to complete as many repetitions with good form as possible for a total of 15.
- Try not to rest in between sets. Go from one exercise on the list to the next. Follow the order on the list for the first couple weeks. There will be alternative exercises offered at the end of this section.
Consistency is the key to a successful fitness program. For best results, each week should include 4 to 7 of these workouts. If you experience any pain during an exercise, stop immediately! If the pain persists seek professional advice.
If you experience any post exercise pain; back off the intensity during the next workout. Also be sure to evaluate your form during exercise. Improper form can lead to injury.
The following exercises utilize a variety of equipment such as gym balls, foam rollers, dumbbells and elastic resistance tubing. Please visit the equipment section of this site for more information. This equipment is light weight and can be taken where ever you go. Where possible, there are alternative methods of performing a specific exercise. This variety will add depth to your work outs.
The Exercises:
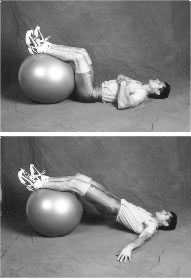 Warm-up with lower back exercises.
- Lay on floor with legs on ball as shown on left.
- Lift pelvis up until body is straight.
- Make sure and tightly contract your buttocks before slowly lowering back to the floor for the next repetition. Remember the slow count described above.
- The goal is a minimum of 20 repetitions.
- Move on to the next exercise.
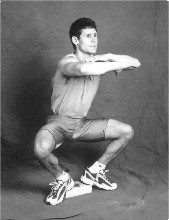
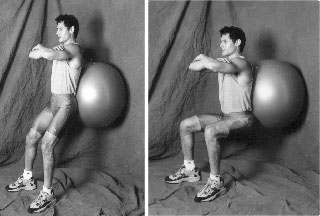 BALL SQUATS
- Hold the gym ball to the small of your back and against the wall. Take a step away from the wall so you are slightly leaning against the gym ball. The feet should be placed slightly wider than shoulder width apart.
- Bend the knees and hips lowering the body to a slow 7 to 10 count.
- Thighs should be parallel to the ground.
- Return to starting position with a 5 count. Do not lock knees and make sure the feet remain flat on the floor during activity.
- Goal is 10-20 repetitions.
- Move on to the next exercise.
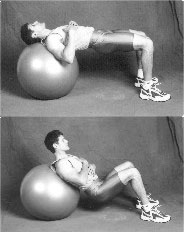 BALL BRIDGES
- Another exercise to strengthen the lower back.
- From a seated position, roll down on the ball until the body is supported by the ball between the shoulder blades.
- Lower buttocks toward the floor as far as you can without touching.
- Raise the pelvis up to the starting position and tightly contract the gluteal musculature (buttocks) before lowering once more.
- The goal is 20 or more repetitions.
- Move on to the next exercise.
BALL SQUATS
- Move on to the next exercise (see above).
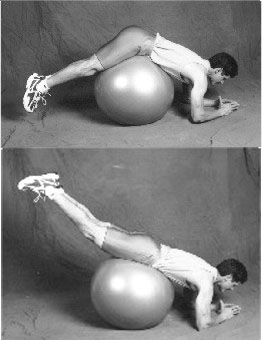 BALL BACK EXTENSIONS
- Kneel in front of the gym ball and transfer the weight of the body to the ball.
- Roll forward, placing the forearms on the ground with the elbows out for balance.
- Raise the legs together using the 7 to 10 count contracting the lower back and buttocks muscles. Lower back down to a 5 count.
 DUCK SQUATS
- Stand with the feet wider than shoulder width with the toes pointing outward. The heels supported by a piece of 2″ X 4″ X 12″ lumbar, a phone book, or other similar sturdy item. Fold the arms across the chest to help with balance.
- Bend at the knees and hips, lowering the body into a squatting position until the thighs are parallel to the floor. The knees should travel slightly out to the side, following foot placement.
- When lowering the body use the slow 7 to 10 count. Return to the starting position at a 5 count. When returning to the starting position do not lock the knees. Keep them softly bent.
- Move onto the next exercise.
BALL BRIDGES
- From a seated position, roll down on the ball until the body is supported by the ball between the shoulder blades.
- Lower buttocks toward the floor as far as you can without touching.
- Raise the pelvis up to the starting position and tightly contract the gluteal musculature (buttocks) before lowering once more.
- The goal is 20 or more repetitions.
- Move on to the next exercise.
.jpg) LUNGES
LUNGES
- To perform the lunge, use a chair, door handle, or hand rail for support. Start with the feet at shoulder width and knees slightly bent.
- Take a step forward with the right foot. The length of the step should allow for comfortable balance, without over-extending the back. Additionally, the knee should not go forward farther than the foot. This will put additional stress on the knee which can lead to injury.
- After stepping forward, slowly (7 to 10 count) lower down until the left knee is about 1 to 2 inches from the floor. Slowly (5 count) returning to the starting position. Repeat with the left leg.
- Move onto the next exercise.
.jpg) STANDING CALF RAISES
STANDING CALF RAISES
- To perform The Standing Calf Raiser, stand on the balls of your feet so the remainder of the foot hangs over the edge of a step or other elevated surface.
- To a 7 to 10 count, raise up on the toes as far as comfortable. Lower your body down flexing the ankle as far as comfortable to a five count. Raise back up to a 7 to 10 count. Advanced raises can be performed on one foot at a time to build additional strength.
- Move on to the next exercise.
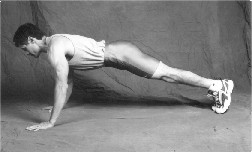 PUSH-UPS (Basic Push-up)
- Assume the standard push-up position. The standard position is maintained with the arms straight, hands pointing forward, the torso and pelvis are held rigid and straight, and the toes hold up the lower end of the body. Hand placement is slightly wider than the shoulders.
- Lower the body by bending the arms to a slow 7 to 10 count. At the bottom raise back to the starting position to a 5 count.
- Move on to the next exercise.
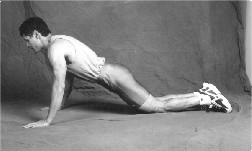 SIDE BAR
There are variations on the push-up to accommodate each level of strength and skill. A person with slight upper body strength can perform the Beginner’s Push-up.
To perform the Beginner’s Push-Up the entire exercise is performed supporting the lower body with the knees instead of the toes as demonstrated in the photograph.
Those with moderate upper body strength can perform the Intermediate Level Push-Ups. These are performed by assuming the standard push-up position as a starting point. Lower the body as if performing the basic push-up. At the bottom, drop to the knees like performing the beginner’s push-up and raise up to the starting position. Upon reaching the starting position assume the standard push-up position again. Repeat.
Using the knees during the raising or lowering phase (or both) of the push-up can assist to build muscle strength when standard push-ups are too challenging. Remember, the key to successful fitness is consistency without injury. For a variation, use the gym ball to support the legs during push ups or, by placing the toes on top of the foam roller, one can concentrate on the upper chest muscles.
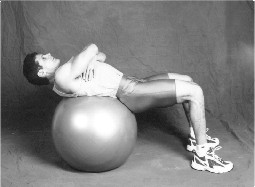 BALL CRUNCHES
- While sitting on the gym ball, roll down until the middle of the back is on top of the ball. Place the arms across the chest or lace the fingers across the back of the head or neck for support. If the hands are used to support the head or neck, remember not to pull on these structures. This could inadvertently injure this area.
- Slightly tighten the abdominal muscles so the pelvis rolls forward.
- Roll the torso up and forward, feeling the stomach muscles tighten to a slow count.
- Roll back down slowly to the starting position. For advanced crunches, lower the torso all the way to the ball so the back is slightly arched.
- Move on to the next exercise.
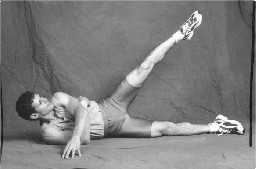
 INNER THIGH LIFTS / LEG ADDUCTORS
- Lay on your side with the top leg bent at the hip and knee.
- Place the foot of the top leg out to the front of the body. The bottom leg is straight with the toes softly pointed.
- Raise the bottom leg up to a slow count, then lower to the starting position. Complete all repetitions then roll over and repeat for the other side.
- Move on to the next exercise.
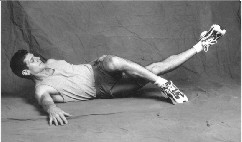
 LEG ABDUCTORS
- To perform this exercise lay on your side with the bottom leg slightly bent at the hip and knee for stability.
- Slightly tighten the abdominal muscles and raise the top leg to a 7 to 10 count making sure that the leg stays in line with the hip.
- Lower slowly to a 5 count, complete all reps for this side, then roll to the opposite side and repeat. Lay on your side with the bottom leg bent.
- Move on to the next exercise.
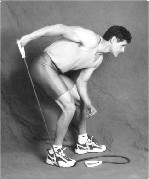
 DOOR ROWING
- To begin, find a door which has a strong set of hinges and a sound door knob, or securely attach a rail to a wall. The structure that you use should be strong enough to withstand the weight of your body pulling on it.
- To perform the Door Rowing exercise hold the ends of a towel in your hands and loop the center around the door knob or rail (see photo). Foot placement is shoulder width with the toes 2 to 3 inches from the doors end.
- Bend slightly at the hips and knees, then lean back. The arms should be outstretched with a slight bend at the elbows and there should be a slight arch to the lower back.
- Let the shoulders slide forward, feeling the muscles between the shoulder blades stretch to the weight of your body. Slowly (7 to 10 count) pull the shoulder blades together while thrusting the chest outward. Using a 5 count return to the position with the shoulder blades spread. This is one repetition.
- Move on to the next exercise.
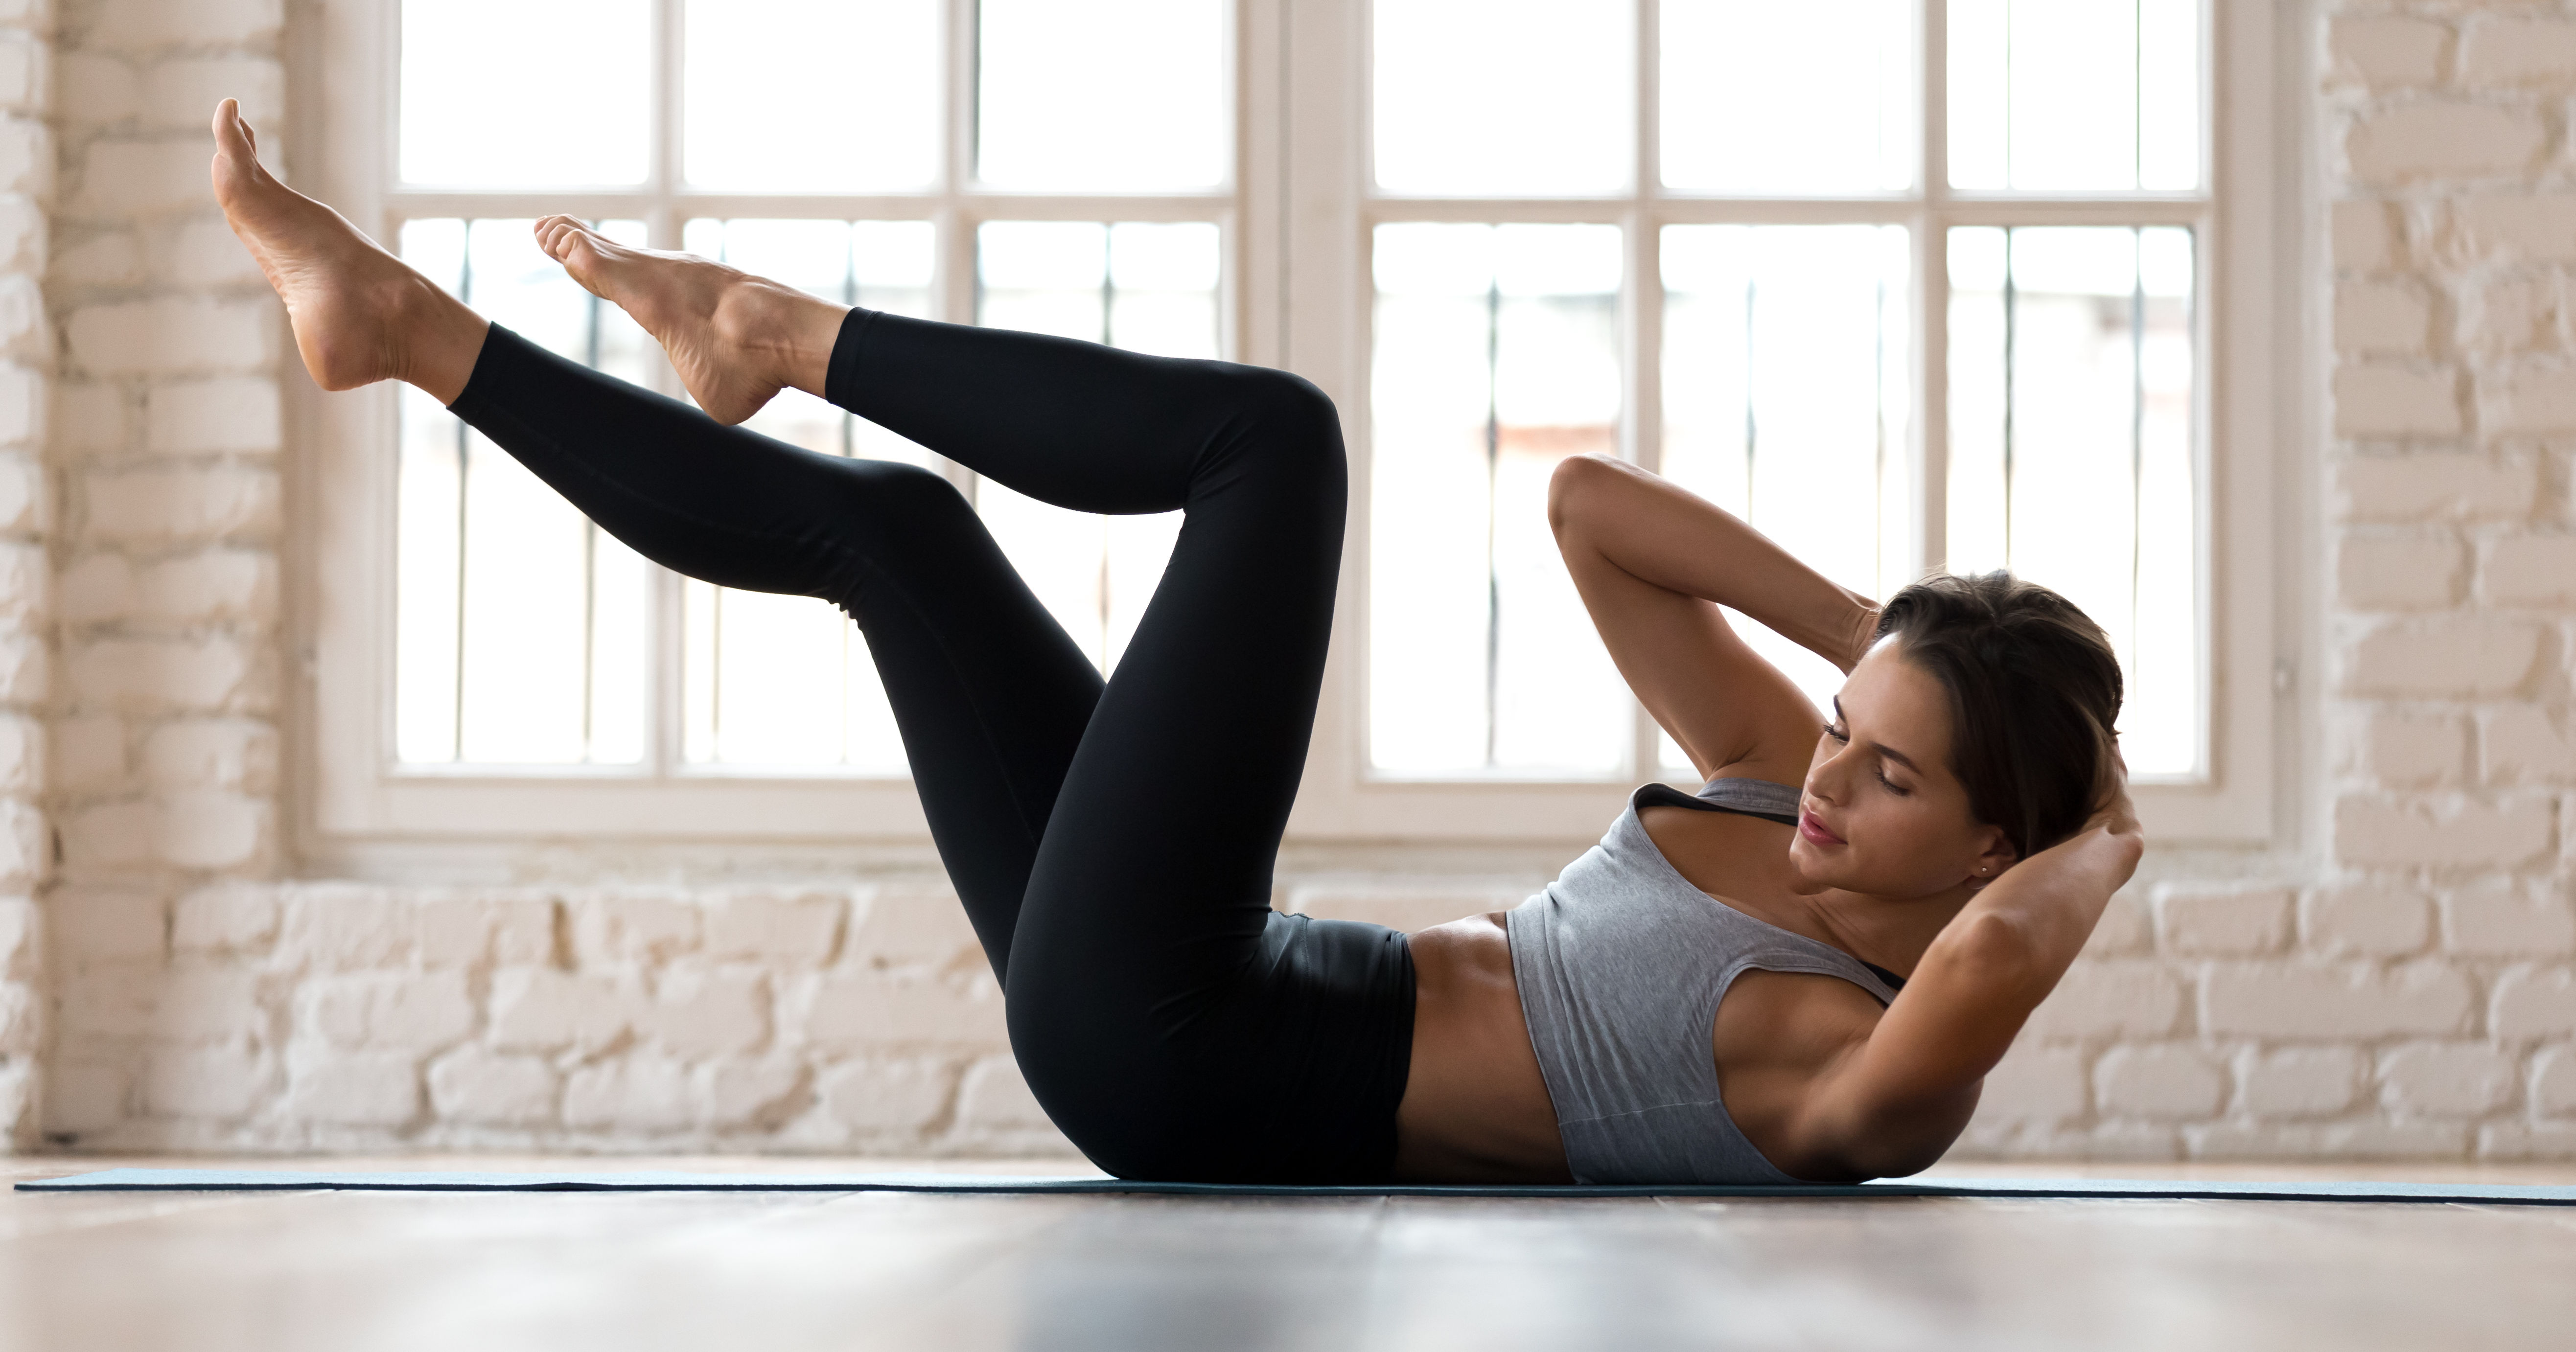
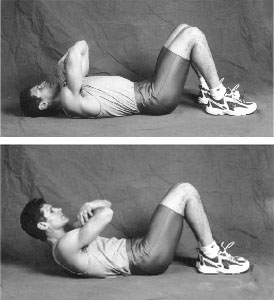 BENT KNEE CRUNCHES
- Lay on the back with knees and hips bent. Place the arms across the chest or lace the fingers across the back of the head or neck for support. If the hands are used to support the head or neck, remember not to pull on these structures. This could inadvertently injure the neck.
- Roll the torso up and forward, feeling the stomach muscles tighten to a slow count.
- Roll down slowly to the starting position. Repeat 20 or more times.
- Move on to the next exercise.
 KICK BACKS (Triceps Exercises)
- Starting with the right arm, stand on one end of the elastic tube with the right foot holding the other end of the tube in the right hand. Bend at the waist, keeping the upper arm to the side.
- The starting position has the elbow bent (the elastic tube should be taut). Slowly straighten the arm until it is full extended (10 count) then lower back to starting position with a 5 count.
- Perform all repetitions before switching to the left arm.
- Move on to the next exercise.
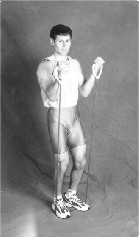 STANDARD BICEPS CURL
- To begin this exercise, stand on the middle of the elastic tube with the ends held in each hand. To start, the arms are extended (the tubing should be taut). Slowly bend the arms at the elbow to a 10 count. This is called arm flexion.
- After full flexion is achieved, slowly straighten the arms to full extension.
- The biceps curl can be performed one arm at a time or with both arms simultaneously. Note the different stabilization techniques used with each of these exercises.
- Move on to the next exercise.
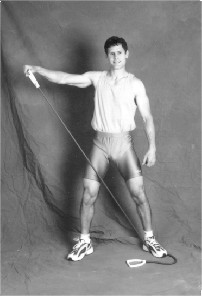 LATERAL ARM RAISES
- To exercise the right shoulder: Stand with the feet wider than shoulder width with one end of the elastic tubing securely held in place by the left foot as in the photograph. Hold the free end of the elastic tubing in the right hand.
- To begin, the right arm should be held to the side and the elastic material should be taught. To a 7 to 10 count, slowly raise the right arm until it is parallel to the floor. Slowly lower to a 5 count. Continue this cadence until all repetitions are completed.
- Switch to the left shoulder.
- Move on to the next exercise.
 FRENCH CURLS
- Starting with the right arm. Stand on one end of the elastic tube with the right foot place the other end of the tube in the right hand.
- Bend the right arm at the elbow while raising your arm so the elbow points to the ceiling (the elastic tube should be taut). Slowly straighten the arm until it is fully extended (10 count) lower back to starting position with a 5 count.
- Complete all repetitions then switch to the left arm.
- Move on to the next exercise.
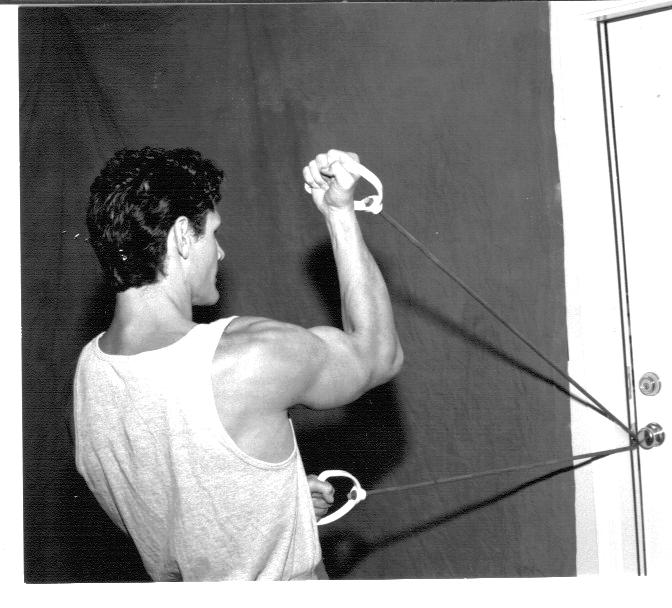 PULLING BICEPS CURL
- Attach the elastic tubing to a door or other suitable structure. The point of attachment should be at shoulder height.
- To start, the arm is extended (the tubing should be taut). Slowly bend the arm at the elbow to a 7 to 10 count. The shoulder joint should not move.
- After full flexion, slowly straighten the arm to full extension.
- Complete all repetitions then switch to the other arm and repeat.
- Move on to the next exercise.
Post on February 13, 2021

Latest Posts
Keeping The Back Healthy Exercises

Why Exercise
February 15, 2021
Shoulder Exercises
February 15, 2021