This section is for:
- The person who has symptomatically improved from a bout of low back pain and needs an aggressive rehabilitation program.
- The fortunate 20% of the population who have not suffered back pain and wish to prevent an occurrence.
- The person who wishes to participate in a general toning program that can be performed at home.
The material presented on the Acute and Moderate Back Pain webpages of the Tereo Chiropractic website contain valuable information and exercises which add depth to your understanding of developing a healthy back. Although this page can stand alone as a complete fitness program, reviewing the material on those pages can greatly help to achieve a goal of pain-free living.
“Winners outrun defeat by not stopping;
Losers give in to defeat by not starting.”
Below are a set of guidelines. When performing exercises in this section, closely adhering to these guidelines will maximize your efforts in terms of strength, endurance, and coordination gains. A by-product of your diligent work will be a decreased percentage of body fat.
GUIDELINES – When performing these exercises:
- Breathe slowly and rhythmically in and out from the mouth during the full movement of every repetition. Breathe in as you prepare for movement and out as you move.
- Perform each exercise very slowly. The positive part of each exercise should be performed to a 7 to 10 count. Counting out Mississippis or using the second hand on a clock are excellent ways to keep on track of your cadence. The negative part of the movement is performed to a 5 count. The negative part of an exercise is when the muscle is shortening or contracting against resistance. The positive part is when the muscle is lengthening against resistance).
- Perform each movement to failure. The goal is to complete as many repetitions with good form as possible for a total of 15.
- Consistency is the key to a successful fitness program. For best results, each week should include 4 to 7 of these workouts. If you experience any pain during an exercise, stop immediately! If the pain persists seek professional advice.
- If you experience any post exercise pain; back off the intensity during the next workout. Also be sure to evaluate your form during exercise. Improper form can lead to injury.
The following exercises utilize a variety of equipment such as gym balls, foam rollers, and elastic resistance tubing. This equipment is light weight and can be taken where ever you go. Where possible, there are alternative methods of performing a specific exercise. This variety will add depth to your work outs.
 SQUATS
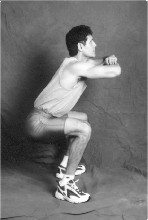
Squats are a big exercise that will strengthen the leg, hip, back, and stomach muscles. This exercise can be performed free standing, with a gym ball, or using a sturdy door or rail for support.
FREE STANDING SQUATS
Stand with the feet slightly wider than shoulder width. Fold the arms across the chest to help with balance. Bend at the knees and hips, lowering the body into a squatting position until the thighs are parallel to the floor. When lowering the body use the slow 7 to 10 count. Return to the starting position at a 5 count. When returning to the starting position do not lock the knees. Keep them softly bent. Make sure the feet remain flat on the floor during the activity.
 BALL SQUATS
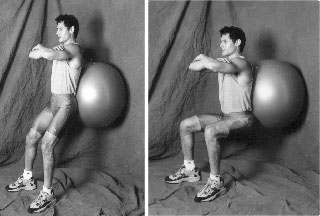
Hold the gym ball to the small of your back and against the wall. Take a step away from the wall so you are slightly leaning against the gym ball. The feet should be placed slightly wider than shoulder width apart. The basic movement is the same as above (see Free Standing Squats).
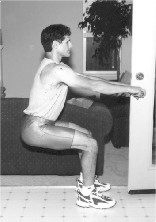 DOOR SQUATS
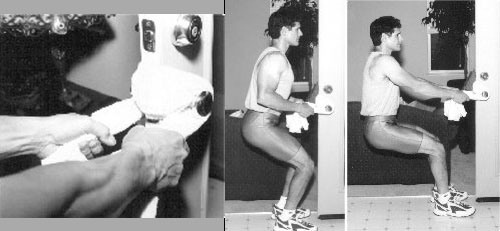
Use a sturdy door or hand rail for support. Open the door half-way and stand at the end of it. Foot placement is wider than shoulder width and as the door swings the radius should clear your toes about two inches. Grasp each side of the door knob with the hands and lean back. The basic movement is the same as the Free Standing Squats.
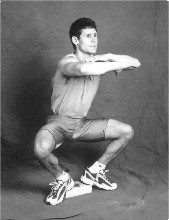 DUCK SQUATS
Duck Squats are similar to regular squats in that the hip, leg, and back muscles are exercised. The alternative foot placement changes the emphasis on muscle groups in the legs adding adaptability through strength and coordination. Duck Squats focus on the inner thigh musculature.
To perform the Duck Squats stand with the feet wider than shoulder width with the toes pointing outward. The heels supported by a piece of two inch X four inch X twelve inch lumbar, a phone book, or other similar sturdy item.
Fold the arms across the chest to help with balance. Bend at the knees and hips, lowering the body into a squatting position until the thighs are parallel to the floor. The knees should travel slightly out to the side, following foot placement. When lowering the body use the slow 7 to 10 count. Return to the starting position at a 5 count. When returning to the starting position do not lock the knees. Keep them softly bent.
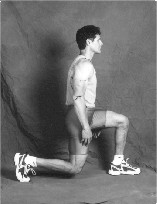 LUNGES
Lunges are a great activity for strengthening and toning the hip and leg musculature while developing an increased sense of balance. To perform the lunge, use a chair, door handle, or hand rail for support. Start with the feet at shoulder width and knees slightly bent. Take a step forward with the right foot. The length of the step should allow for comfortable balance, without over-extending the back. Additionally, the knee should not go forward farther than the foot. This will put additional stress on the knee which can lead to injury. After stepping forward, slowly (7 to 10 count) lower down until the left knee is about 1 to 2 inches from the floor. Slowly (5 count) returning to the starting position. Repeat with the left leg.
.jpg) STANDING CALF RAISES
STANDING CALF RAISES
The muscles to the back of the lower leg are called the calf muscles or the gastrocnemius and soleus muscles (gastroc-soleus complex). These are postural muscles that are used to help with balance and stability. Strong calf muscles equal a sturdy base. The calf raiser exercise will build strength and endurance to these muscles. The muscles of the lower leg are postural muscles and require consistent exercise to build-up endurance.
To perform The Standing Calf Raiser, stand on the balls of your feet so the remainder of the foot hangs over the edge of a step or other elevated surface. To a 7 to 10 count, raise up on the toes as far as comfortable. Lower your body down flexing the ankle as far as comfortable to a five count. Raise back up to a 7 to 10 count. Advanced raises can be performed on one foot at a time to build additional strength.
BACK EXTENSION EXERCISES
The next group of exercises strengthen the musculature of the lower back. The goal for a healthy back is to build strength through endurance. Performing a variety of exercises that work a muscle group in different ways will increase strength and adaptability of the area. A stronger and more adaptable back will be less likely to be a source of pain in the future.
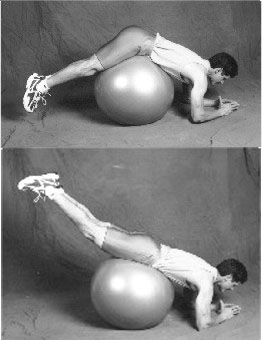 BALL BACK EXTENSIONS (for beginners)
To begin, kneel in front of the gym ball and transfer the weight of the body to the ball. Roll forward, placing the forearms on the ground with the elbows out for balance. Raise the legs together using the 7 to 10 count contracting the lower back and buttocks muscles. Lower back down to a 5 count. Ball Back Extensions are an excellent exercise to build strength and endurance to the lower back.
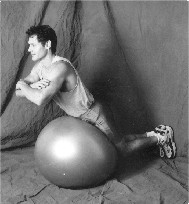 BALL FACILITATED BACK EXTENSIONS (Advanced)
This is an advanced exercise that requires a very stable back. If there is any back pain present or if you are new to exercise do not perform this activity.
To perform, kneel on the floor with the feet against a sturdy wall and the gym ball at your knees. Roll forward so the body weight transfers to the gym ball and wall. The chest should be resting on the ball. As in the photograph, raise the chest up off the ball to a 7 to 10 count contracting the hip and back muscles. Lower back down to a 5 count.
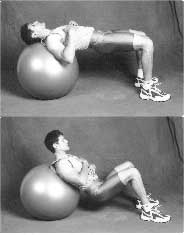 BALL BRIDGES
Sit down and roll down until the part of the back between the shoulder blades is resting firmly on the ball. The knees should be bent to 90 degrees with the feet flat on the floor. Bend at the hips, lowering the buttocks down as far as stability on the ball will permit (slow count). Raise the pelvis back to the original position to a 5 count.
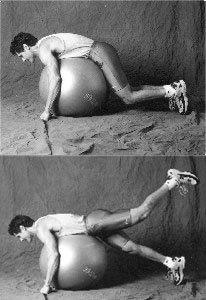 GLUTEAL FLEXER (Ball)
To perform this activity, knee in front of the gym ball, roll forward transferring body weight to the chest. Straighten the legs keeping the toes on the floor. Raise one leg up and back to a 7 to 10 count as demonstrated in the photograph. The muscles of the leg, hip, and lower back should contract. Be sure not to force the movement. Lower the leg back to starting position using a 5 count and repeat with the other leg to complete the first repetition.
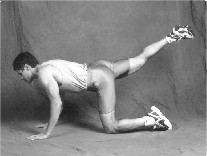 FLOOR GLUTEAL FLEXER
To begin, kneel on all fours. Raise one leg up and back to a 7 to 10 count. You should feel the leg, hip and back muscles contract. Be sure not force the movement. Lower the leg back to starting position using a 5 count. Repeat with the other leg to complete the first repetition.
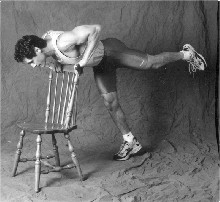 GLUTEAL FLEXER (chair, kitchen counter, or other supportive structure)
To perform, stand facing a counter or chair back bend at the hips until your torso is parallel to the floor. Support the upper body with the hands by holding onto the chair back or counter. Raise one leg up and back to a 7 to 10 count. You should feel the leg, hip and back muscles contract. Be sure not force the movement. Lower the leg back to starting position using a 5 count. Repeat with the other leg to complete the first repetition.
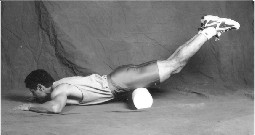 PRONE LEG RAISER
To perform this exercise laying face down on the floor with the foam roller under the pelvis. Raise one leg up to a slow count as far as comfortable. Lower back to floor to a 7 to 10 count. You should feel the leg, hip and back muscles contract. Be sure not to force the movement. Lower the leg back to starting position using a 5 count. Repeat with the other leg to complete on repetition.
DOOR ROWING
This exercise focuses on the musculature of the upper back. To begin, find a door which has a strong set of hinges and a sound door knob, or securely attach a rail to a wall. The structure that you use should be strong enough to withstand the weight of your body pulling on it.
To perform the Door Rowing exercise hold the ends of a towel in your hands and loop the center around the door knob or rail (see photo). Foot placement is shoulder width with the toes 2 to 3 inches from the doors end.
Bend slightly at the hips and knees, then lean back. The arms should be outstretched with a slight bend at the elbows and there should be a slight arch to the lower back.
Let the shoulders slide forward, feeling the muscles between the shoulder blades stretch to the weight of your body. Slowly (7 to 10 count) pull the shoulder blades together while thrusting the chest outward. Using a 5 count return to the position with the shoulder blades spread. This is one repetition.
HIP/LEG EXERCISES
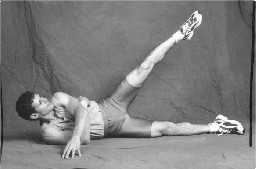 SIDE RAISES / ABDUCTOR LIFT
To perform this exercise lay on your side with the bottom leg slightly bent at the hip and knee for stability. Slightly tighten the abdominal muscles and raise the top leg to a 7 to 10 count making sure that the leg stays in line with the hip. Lower slowly to a 5 count, complete all reps for this side, then roll to the opposite side and repeat.
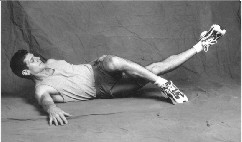 INNER THIGH LIFTS / LEG ADDUCTORS
To perform this exercise lay on your side with the top leg bent at the hip and knee. Place the foot of the top leg out to the front of the body. The bottom leg is straight with the toes softly pointed. Raise the bottom leg up to a slow count, then lower to the starting position. Complete all repetitions then roll over and repeat for the other side. Leg Adductor exercises strengthen while building endurance to the hip, abdominal, and leg musculature.
ABDOMINAL EXERCISES
There are several ways to build strength and endurance into the abdominal muscles. The goal to successful strengthening is to produce fatigue to the muscle group without irritating it. Standard sit-ups can place undue stress on the low back, therefore, are not recommended. Following are a variety of “crunching” type activities which will strengthen the abdominal musculature without irritating the back.
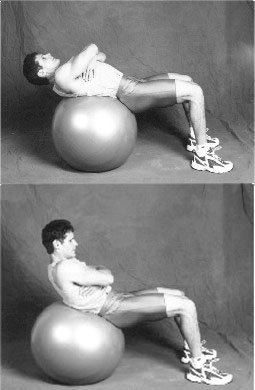 BALL CRUNCHES
While sitting on the gym ball, roll down until the middle of the back is on top of the ball. Place the arms across the chest or lace the fingers across the back of the head or neck for support. If the hands are used to support the head or neck, remember not to pull on these structures. This could inadvertently injure this area. Slightly tighten the abdominal muscles so the pelvis rolls forward. Roll the torso up and forward, feeling the stomach muscles tighten to a slow count. Roll back down slowly to the starting position. For advanced crunches, lower the torso all the way to the ball so the back is slightly arched.
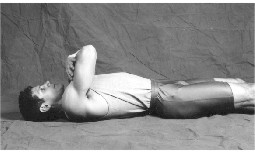 STRAIGHT LEG CRUNCHES
This exercise is performed on the floor or a flat, level supportive structure. Lay on the back with straight legs and toes softly pointed. Place the arms across the chest or lace the fingers across the back of the head or neck for support. If the hands are used to support the head or neck, remember not to pull on these structures. This could inadvertently injure the neck. Roll the torso up and forward, feeling the stomach muscles tighten to a slow count. Roll down slowly to the starting position. Repeat.
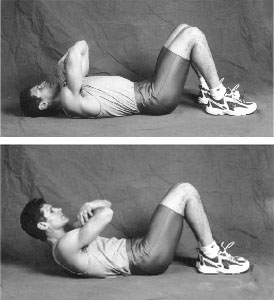 BENT KNEE CRUNCHES
This exercise is performed on the floor or a flat, level supportive structure. Lay on the back with knees and hips bent. Place the arms across the chest or lace the fingers across the back of the head or neck for support. If the hands are used to support the head or neck, remember not to pull on these structures. This could inadvertently injure the neck. Roll the torso up and forward, feeling the stomach muscles tighten to a slow count. Roll down slowly to the starting position. Repeat.
The integrity of a joint can be measured by how well opposing muscle groups work together. For example, as one flexes their arm, the biceps muscle shortens and the muscles at the back of the arm (triceps) elongates.
These muscles work together as a team to ensure harmonious joint movement. The following exercises are not directly related to strengthening the back but will enhance the overall integrity of the way the body functions.
UPPER BODY EXERCISES
 PUSH-UPS
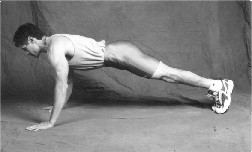
Push Ups are excellent for strengthening the chest (pectoralis), shoulders (anterior deltoid), and arm (triceps) musculature. There are several ways to perform this activity to obtain different results. In general, a wide hand placement will work the inner chest musculature more and a very close hand placement will emphasize the triceps.
 BASIC PUSH-UP
For this exercise, assume the standard push-up position. The standard position is maintained with the arms straight, hands pointing forward, the torso and pelvis are held rigid and straight, and the toes hold up the lower end of the body. Hand placement is slightly wider than the shoulders. Lower the body by bending the arms to a slow 7 to 10 count. At the bottom raise back to the starting position to a 5 count.
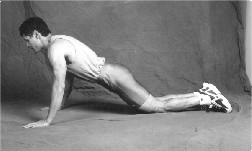
There are variations on the push-up to accommodate each level of strength and skill. A person with slight upper body strength can perform the Beginner’s Push-up. To perform the Beginner’s Push-Up the entire exercise is performed supporting the lower body with the knees instead of the toes as demonstrated in the photograph.
Those with moderate upper body strength can perform the Intermediate Level Push-Ups. These are performed by assuming the standard push-up position as a starting point. Lower the body as if performing the basic push-up. At the bottom, drop to the knees like performing the beginner’s push-up and raise up to the starting position. Upon reaching the starting position assume the standard push-up position again. Repeat.
Using the knees during the raising or lowering phase (or both) of the push-up can assist to build muscle strength when standard push-ups are too challenging. Remember, the key to successful fitness is consistency without injury. For a variation, use the gym ball to support the legs during push ups or, by placing the toes on top of the foam roller, one can concentrate on the upper chest muscles.
TRICEPS EXERCISES
To exercise the muscles at the back of the arm you will be using the elastic tubing or a dumbbell.
 KICK BACKS
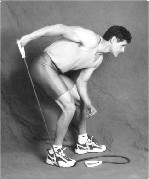
Starting with the right arm, stand on one end of the elastic tube with the right foot holding the other end of the tube in the right hand. Bend at the waist, keeping the upper arm to the side. The starting position has the elbow bent (the elastic tube should be taut). Slowly straighten the arm until it is full extended (10 count) then lower back to starting position with a 5 count. Perform all repetitions before switching to the left arm.
“Push” will get a person almost everywhere,
Except through a door marked “pull.”
 FRENCH CURLS
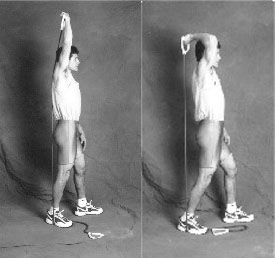
Starting with the right arm. Stand on one end of the elastic tube with the right foot place the other end of the tube in the right hand. Bend the right arm at the elbow while raising your arm so the elbow points to the ceiling (the elastic tube should be taut). Slowly straighten the arm until it is fully extended (10 count) lower back to starting position with a 5 count. Complete all repetitions then switch to the left arm.
French Curls and Kick Backs can be performed with free weights or with the elastic tubing. Any found object such as cans of soup, water bottles, etc. can also be used to provide resistance.
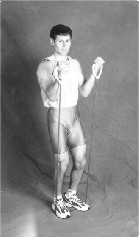 BICEPS EXERCISES
The muscles at the front of the arm are called the biceps. This muscle group works in conjunction with the triceps to help with arm movements. Following are exercises which allow the arms (biceps) to be exercised separately or simultaneously.
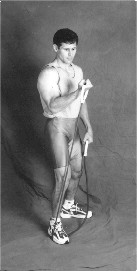 STANDARD BICEPS CURL
To begin this exercise, stand on the middle of the elastic tube with the ends held in each hand. To start, the arms are extended (the tubing should be taut). Slowly bend the arms at the elbow to a 10 count. This is called arm flexion. After full flexion is achieved, slowly straighten the arms to full extension.
The biceps curl can be performed one arm at a time or with both arms simultaneously. Note the different stabilization techniques used with each of these exercises.
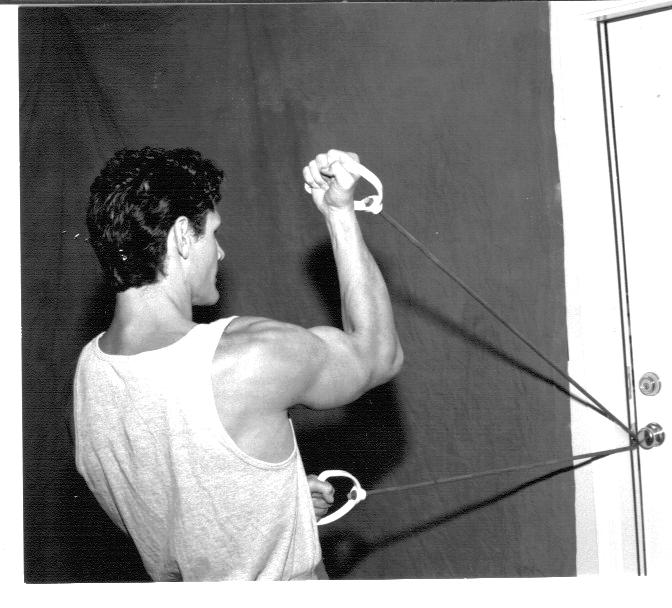 PULLING BICEPS CURL
Attach the elastic tubing to a door or other suitable structure. The point of attachment should be at shoulder height. To start, the arm is extended (the tubing should be taut). Slowly bend the arm at the elbow to a 7 to 10 count. The shoulder joint should not move. After full flexion, slowly straighten the arm to full extension. Complete all repetitions then switch to the other arm and repeat. The Pulling Biceps Curl changes the angle at which the muscle pulls, adding variety and depth to the workout.
SHOULDER EXERCISES
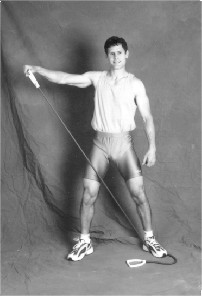 LATERAL ARM RAISES
To exercise the right shoulder: Stand with the feet wider than shoulder width with one end of the elastic tubing securely held in place by the left foot as in the photograph. Hold the free end of the elastic tubing in the right hand. To begin, the right arm should be held to the side and the elastic material should be taught. To a 7 to 10 count, slowly raise the right arm until it is parallel to the floor. Slowly lower to a 5 count. Continue this cadence until all repetitions are completed then switch to the left shoulder. The Lateral Raise will help to strengthen the shoulder musculature.
PUTTING IT ALL TOGETHER
THE EXERCISE PROGRAMS
The information contained in this website builds upon itself if followed sequentially from each listed page. The journey began with basic anatomy and physiology. The activities introduced in succeeding pages dovetailed to provide a concise exercise plan for building a better back regardless of one’s current level of stability. Following is a work-out program based on the activities covered in this chapter. The program is designed for versatility and to maximize results by providing a routine which incorporates all major muscle groups of the body.
THE DESCENDING PRIORITY WORKOUT
The following exercise program is called the Descending Priority Workout. The activities are laid out in a specific order. The theory is to exercise large muscle groups first followed by the smaller ones. This accomplishes two things; (1) muscles have a certain amount of stored energy called glycogen. Large muscles are harder to work-out and consume more energy. By exercising the big muscles first, one can maximize on this stored resource. (2) smaller muscles always accompany large muscles with movement. Exercising the various larger muscles will pre-fatigue the smaller ones. This translates into economy of time and movement. Less time needs to be spent directly exercising the smaller muscles. For example, when the chest is exercised, the shoulder (anterior deltoid) and triceps muscles are indirectly stimulated as the pectoralis major and minor (chest muscles) contract. These smaller muscles will then require less stimulation.
The flow of the Descending Priority Work-Out begins with the large muscles of the hips, buttocks, and legs followed by the lower and upper back musculature. Abdominal exercises helps to strengthen the pelvis and lower back and acts as a segue into the upper body which includes the chest followed by the shoulders and arms.
One can achieve marked results in health and fitness using The Descending Priority Workout Program as little as three workouts per week. At five workouts per week, you will be well protected from experiencing an onset of back pain and at seven times per week one should be bulletproof.
On the following page there will be a “menu” of exercises. The key to using this program is to start with exercise number one and progress in numeric order to number thirteen. The exercise numbers are found in the column on the left of the chart. The bold faced choices are the main exercises. The alphabetized selections below the main exercise are variations which one can pick and choose from to add variety and customize their routine.
The middle column is the target repetitions to achieve prior to adding more sets. When one can perform a solid set of 15 repetitions, the addition of another set is in order.
DESCENDING EXERCISE WORK-OUT
| ACTIVITY | EXERCISE DESCRIPTION | TARGET |
| Exercise 1 | Squats (choose one) |
|
| Choice A | Standing Squats | 15 |
| Choice B | Ball Squats | 15 |
| Choice C | Door Squats | 15 |
| Exercise 2 | Duck Squats | 15 |
| Exercise 3 | Lunges | 15 |
| Exercise 4 | Calf Raiser | 15 |
| Exercise 5 | Lower Back (choose 2) |
|
| Choice A | Ball Back Extensions | 15 |
| Choice B | Ball Bridges | 15 |
| Choice C | Gluteal Flexer-floor | 15 |
| Choice D | Gluteal Flexer-chair | 15 |
| Choice E | Prone Leg Raiser | 15 |
| Choice F | Reverse Leg Raiser | 15 |
| Exercise 6 | Door Rowing | 15 |
|
| HIP/LEG EXERCISES |
|
| Exercise 7 | Abductor Lift | 15 |
| Exercise 8 | Leg Adductor | 15 |
| Exercise 9 | Adbominals (choose 2) |
|
| Choice A | Ball Crunches | 15 – 30 |
| Choice B | Straight Leg Crunches | 15 – 30 |
| Choice C | Bent Knee Crunches | 15 – 30 |
|
| UPPER BODY |
|
| Exercise 10 | Push Ups | 15 |
| Exercise 11 | Triceps Exercise | 15 |
| Exercise 12 | Biceps Exercise | 15 |
| Exercise 13 | Lateral Raise | 15 |
| Cool down | Ball Crunches | 15 – 30 |
SAMPLE WORKOUTS
Below are four fitness routines derived from the exercises listed above. These are suggested routines. One can pick and choose from the list above to customize their own routine or use these sample workouts. Either way, the key is to vary the exercises within the routine from workout to workout. Keep in mind, adaptability along with strength, endurance, and coordination are essential to building a better back.
EXAMPLE ONE
| ACTIVITY | REPETITIONS |
| Standing Squats | 15 |
| Duck Squats | 15 |
| Lunges | 15 |
| Calf Raises | 15 |
| Ball Back Extensions | 15 |
| Floor Gluteal Flexer | 15 |
| Door Rowing | 15 |
| Abductor Lift | 15 |
| Leg Adductor | 15 |
| Ball Crunches | 15 |
| Bent Knee Crunches | 15 |
| Push Ups | 15 |
| French Curls | 15 |
| Standard Biceps Curls | 15 |
| Lateral Raises | 15 |
EXAMPLE TWO
| ACTIVITY | REPETITIONS |
| Ball Squats | 15 |
| Duck Squats | 15 |
| Lunges | 15 |
| Calf Raises | 15 |
| Ball Back Extensions | 15 |
| Chair Gluteal Flexer | 15 |
| Door Rowing | 15 |
| Abductor Lift | 15 |
| Leg Adductor | 15 |
| Straight Leg Crunches | 15 |
| Ball Crunches | 15 |
| Push Ups | 15 |
| Kick Backs | 15 |
| Standard Biceps Curls | 15 |
| Lateral Raises | 15 |
EXAMPLE THREE
| ACTIVITY | REPETITIONS |
| Door Squats | 15 |
| Duck Squats | 15 |
| Lunges | 15 |
| Calf Raises | 15 |
| Ball Back Extensions | 15 |
| Ball Bridges | 15 |
| Door Rowing | 15 |
| Abductor Lift | 15 |
| Leg Adductor | 15 |
| Straight Leg Crunches | 15 |
| Bent Leg Crunches | 15 |
| Push Ups | 15 |
| French Curls | 15 |
| Pulling Biceps Curls | 15 |
| Lateral Raises | 15 |
EXAMPLE FOUR
| ACTIVITY | REPETITIONS |
| Standing Squats | 15 |
| Duck Squats | 15 |
| Lunges | 15 |
| Calf Raises | 15 |
| Ball Back Extensions | 15 |
| Prone Leg Raiser | 15 |
| Door Rowing | 15 |
| Abductor Lift | 15 |
| Leg Adductor | 15 |
| Ball Crunches | 15 |
| Bent Leg Crunches | 15 |
| Push Ups | 15 |
| Kick Backs | 15 |
| Pulling Biceps Curls | 15 |
| Lateral Raises | 15 |

